
Albino bat light-up halloween costume / wearable photography gear
Halloween season and pcomp midterms were a wonderful opportunity to lay my hands on a first, ambitious project in wearable electronics.
The objective: to design more that just a spooky costume, but also a practical wearable electronic device, capable of capturing footage at halloween’s wildest parties.
The inspiration: albino bat.
A rare, true freak of nature.

My teammate for the project is Jacky Liu, whose affiliation to fine arts and experience in coding were crucial for the bat wings working properly. My outside-of-ITP advisor was Uriel Guy, the inventor of the Touchy Blinky, an engineer expert on wings and anything LED. The albino bat vision wouldn’t have come to life without them.

Project description
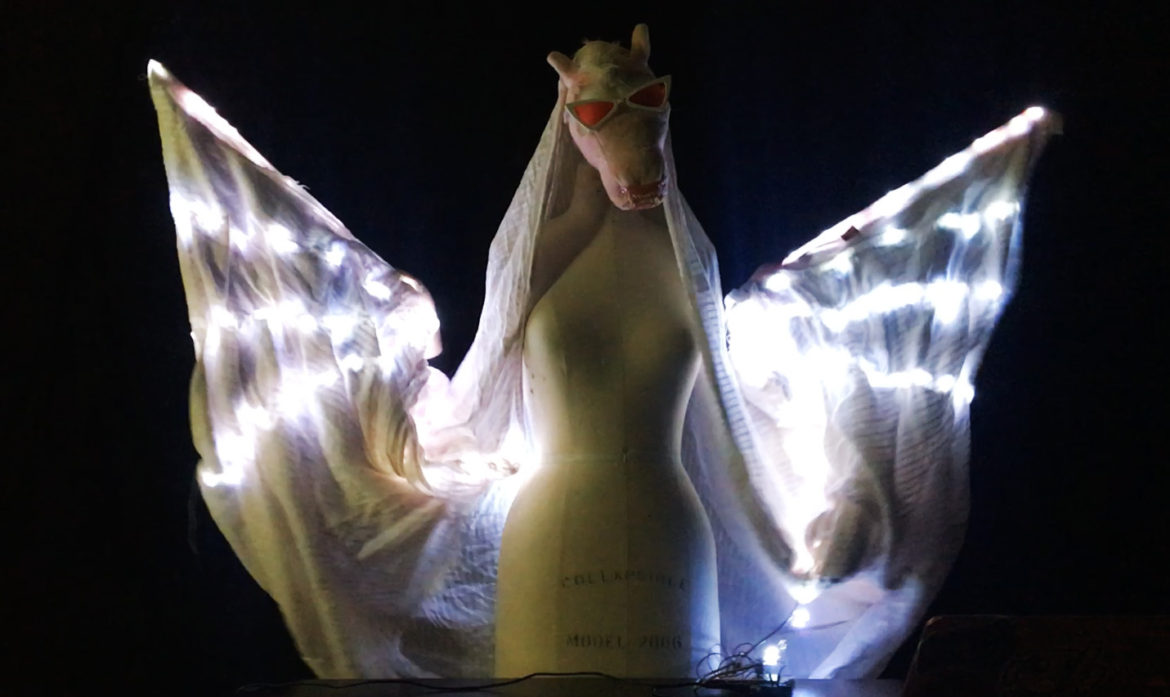
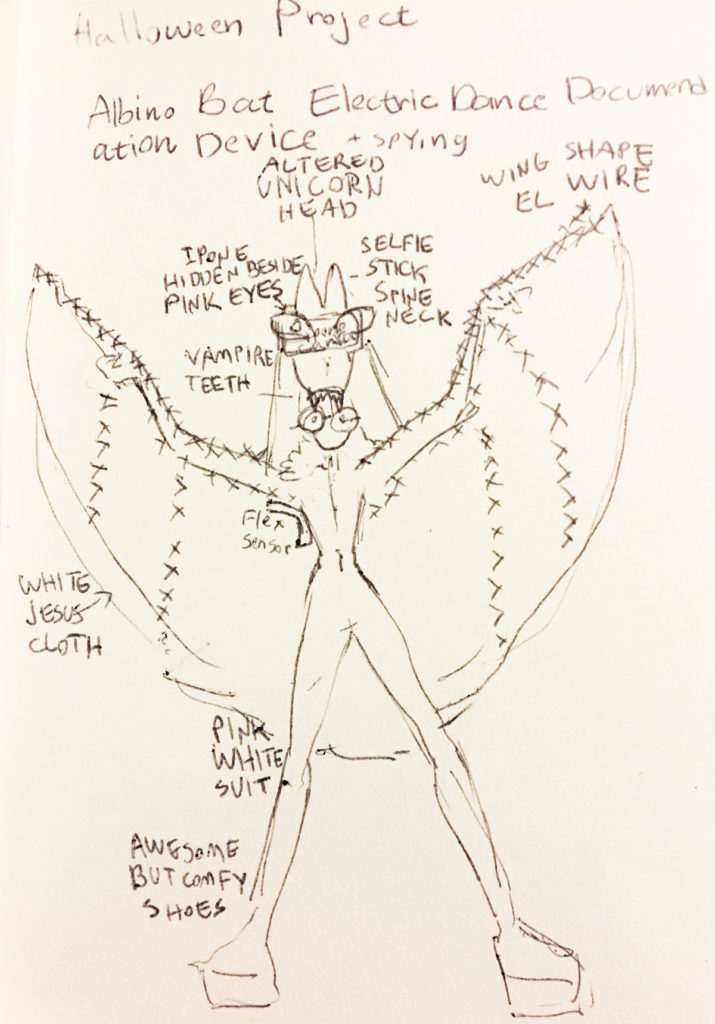
The albino bat wings are hand-made extensions to human arms, imitating the structure of the bat’s wings. LED stripes (“fairy lights”) sewn into the fabric and wrapped around thin fiberglass rods to recreate the bat’s freakishly long fingers.
The albino bar doesn’t just look great – it also enables the person wearing the costume see in the depth of night, as if they were an actual bat. The distribution of the LED lights and gentle diffusion with white cloth, creates a bright, even, flattering light.
Used with a camera placed within the costume’s head, the albino bat is an automatic, hands-off photography device suited for the roughest, darkest party conditions.
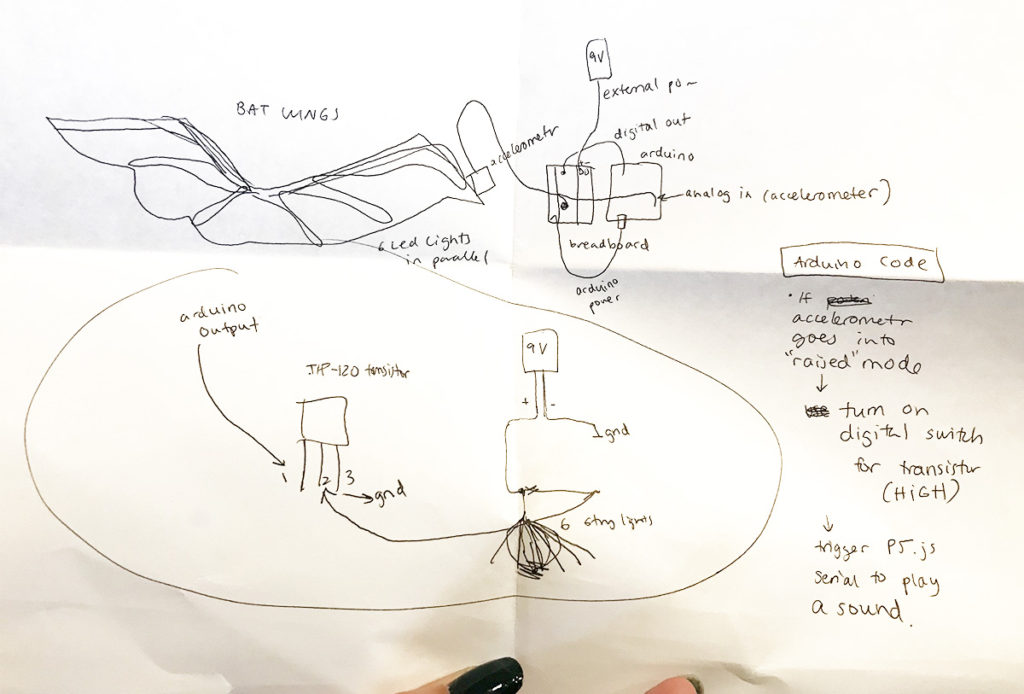
The main sensor used to activate the wings is a gyroscope / accelerometer. Placed on the left finger-rod, it basically measures the angle where it’s pointed. We programmed it to activate the light and sound when passing a threshold of 60 degrees.
Wearable Electronics: Albino Bat halloween costume from Alizarin Zroob on Vimeo.
The albino bat exists in two variations.
Exhibit variation
controlled by an arduino uno, and powered by a laptop. Produces a variety of random creepy sounds, via a serial connection to a JavaScript file.
Its arduino code:
int transistorPin = 9;
int brightness;Serial.begin(115200);
void setup()

{// Before initializing the IMU, there are a few settings
// we may need to adjust. Use the settings struct to set
// the device’s communication mode and addresses:
imu.settings.device.commInterface = IMU_MODE_I2C;
imu.settings.device.mAddress = LSM9DS1_M;
imu.settings.device.agAddress = LSM9DS1_AG;
// The above lines will only take effect AFTER calling
// imu.begin(), which verifies communication with the IMU
// and turns it on.
if (!imu.begin())
{
Serial.println(“Failed to communicate with LSM9DS1.”);
Serial.println(“Double-check wiring.”);
Serial.println(“Default settings in this sketch will ” \
“work for an out of the box LSM9DS1 ” \
“Breakout, but may need to be modified ” \
“if the board jumpers are.”);
while (1)
;
}pinMode(transistorPin, OUTPUT);
// digitalWrite(ledPin, HIGH);`
//digitalWrite(transistorPin, HIGH);
}void loop()
{
// Update the sensor values whenever new data is available
if ( imu.gyroAvailable() )
{
// To read from the gyroscope, first call the
// readGyro() function. When it exits, it’ll update the
// gx, gy, and gz variables with the most current data.
imu.readGyro();
}
if ( imu.accelAvailable() )
{
// To read from the accelerometer, first call the
// readAccel() function. When it exits, it’ll update the
// ax, ay, and az variables with the most current data.
imu.readAccel();
}
if ( imu.magAvailable() )
{
// To read from the magnetometer, first call the
// readMag() function. When it exits, it’ll update the
// mx, my, and mz variables with the most current data.
imu.readMag();
}if ((lastPrint + PRINT_SPEED) < millis())
{
// printGyro(); // Print “G: gx, gy, gz”
// printAccel(); // Print “A: ax, ay, az”
// printMag(); // Print “M: mx, my, mz”
// Print the heading and orientation for fun!
// Call print attitude. The LSM9DS1’s mag x and y
// axes are opposite to the accelerometer, so my, mx are
// substituted for each other.
printAttitude(imu.ax, imu.ay, imu.az,
-imu.my, -imu.mx, imu.mz);
Serial.println();lastPrint = millis(); // Update lastPrint time
}
}void printGyro()
{
// Now we can use the gx, gy, and gz variables as we please.
// Either print them as raw ADC values, or calculated in DPS.
Serial.print(“G: “);
#ifdef PRINT_CALCULATED
// If you want to print calculated values, you can use the
// calcGyro helper function to convert a raw ADC value to
// DPS. Give the function the value that you want to convert.
Serial.print(imu.calcGyro(imu.gx), 2);
Serial.print(“, “);
Serial.print(imu.calcGyro(imu.gy), 2);
Serial.print(“, “);
Serial.print(imu.calcGyro(imu.gz), 2);
Serial.println(” deg/s”);
#elif defined PRINT_RAW
Serial.print(imu.gx);
Serial.print(“, “);
Serial.print(imu.gy);
Serial.print(“, “);
Serial.println(imu.gz);
#endif
}void printAccel()
{
// Now we can use the ax, ay, and az variables as we please.
// Either print them as raw ADC values, or calculated in g’s.
Serial.print(“A: “);
#ifdef PRINT_CALCULATED
// If you want to print calculated values, you can use the
// calcAccel helper function to convert a raw ADC value to
// g’s. Give the function the value that you want to convert.
Serial.print(imu.calcAccel(imu.ax), 2);
Serial.print(“, “);
Serial.print(imu.calcAccel(imu.ay), 2);
Serial.print(“, “);
Serial.print(imu.calcAccel(imu.az), 2);
Serial.println(” g”);
#elif defined PRINT_RAW
Serial.print(imu.ax);
Serial.print(“, “);
Serial.print(imu.ay);
Serial.print(“, “);
Serial.println(imu.az);
#endif}
void printMag()
{
// Now we can use the mx, my, and mz variables as we please.
// Either print them as raw ADC values, or calculated in Gauss.
Serial.print(“M: “);
#ifdef PRINT_CALCULATED
// If you want to print calculated values, you can use the
// calcMag helper function to convert a raw ADC value to
// Gauss. Give the function the value that you want to convert.
Serial.print(imu.calcMag(imu.mx), 2);
Serial.print(“, “);
Serial.print(imu.calcMag(imu.my), 2);
Serial.print(“, “);
Serial.print(imu.calcMag(imu.mz), 2);
Serial.println(” gauss”);
#elif defined PRINT_RAW
Serial.print(imu.mx);
Serial.print(“, “);
Serial.print(imu.my);
Serial.print(“, “);
Serial.println(imu.mz);
#endif
}// Calculate pitch, roll, and heading.
// Pitch/roll calculations take from this app note:
// http://cache.freescale.com/files/sensors/doc/app_note/AN3461.pdf?fpsp=1
// Heading calculations taken from this app note:
// http://www51.honeywell.com/aero/common/documents/myaerospacecatalog-documents/Defense_Brochures-documents/Magnetic__Literature_Application_notes-documents/AN203_Compass_Heading_Using_Magnetometers.pdf
void printAttitude(float ax, float ay, float az, float mx, float my, float mz)
{
float roll = atan2(ay, az);
float pitch = atan2(-ax, sqrt(ay * ay + az * az));float heading;
if (my == 0)
heading = (mx < 0) ? PI : 0; else heading = atan2(mx, my); heading -= DECLINATION * PI / 180; if (heading > PI) heading -= (2 * PI);
else if (heading < -PI) heading += (2 * PI);// Convert everything from radians to degrees:
heading *= 180.0 / PI;
pitch *= 180.0 / PI;
roll *= 180.0 / PI;Serial.println(heading);
if (abs(heading)< 60 || heading > 0 ){
digitalWrite(transistorPin, HIGH);
} else {
digitalWrite(transistorPin, LOW);
}
Portable variation
Lighter, muted version suited for nightlife conditions. Controlled by an arduino nano and powered by a portable power bank. It has a potentiometer to adjust the level of brightness. And the creepiest part: a cellphone hidden inside the albino bat’s head, programmed to automatically take a photo every 2 seconds once the bat’s wings are lit. The photography is triggered via a repurposed selfie-stick mechanism.
Its arduino code:
void setup() {
Serial.begin(115200);
pinMode(6, OUTPUT);
}bool on = false;
using ulong = unsigned long;
ulong start;
ulong last_time;
int last_print = 0;void loop() {
uint32_t sum = 0;
for (int i = 0 ; i < 10 ; i++) { uint32_t val = analogRead(2); sum += val * val; } sum /= 1023; bool new_on = sum > 200;
if (new_on ^ on) {
start = millis();
last_time = start;
pinMode(9, INPUT);
Serial.println(“mode switch”);
}
on = new_on;if (on) {
ulong time = (millis() – start) % 2100;
if (time > 2000 && last_time <= 2000) {
Serial.println(“Selfie!”);
pinMode(9, OUTPUT);
}
else if (time < last_time) {
Serial.println(“off!”);
pinMode(9, INPUT);
}
last_time = time;
}analogWrite(6, sum / 40);
int to_print = sum / 10;
if (last_print != to_print) {
Serial.println(to_print);
last_print = to_print;
}
}
Footage taken with the device on it’s first run might give a clue on what an albino bat might see through bloody-red eyes 😉
Happy Halloween, and beware – if you see an albino bat out glowing at a party, you’re probably being photographed.